Long drives leave a film on paint that regular washing can’t touch. Highway speeds bake on bug proteins. Mountain passes sling tar and tiny asphalt shrapnel into wheel wells. Coastal routes add salt spray and magnesium chloride. Park under a tree for lunch and you pick up pollen and sap. By the time you pull into the driveway, your exterior wears a layered stack of contamination, each type bonding differently to clear coat, glass, plastics, and wheels. A simple bucket wash might make it look clean for a day, but the embedded material remains, dulling the finish, dragging under your drying towel, and accelerating corrosion in seams and hardware.
What follows is a decontamination checklist built from real-world exterior detailing. It’s not a rigid template. Materials vary by season and route. A car that ran Interstates across the Central Valley has different fallout than a convertible that hugged Highway 1. The goal is to diagnose what landed on the vehicle and remove it in the safest sequence, start to finish, so you don’t grind one contaminant into another.
Why road-trip contamination sticks so stubbornly
Contaminants bond by chemistry and by heat. Bug splatter contains proteins and sugars that crosslink as they dry, essentially gluing themselves to the clear. Tar and asphalt are petroleum based and soften in the heat generated by tire rotation, then atomize and speckle along the rockers and rear bumper. Rail dust and brake fallout are iron particles that corrode and expand when wet, lodging like tiny barbs into clear coat pores. Coastal mist and winter chemicals carry salts that wick into seams and fasteners, pulling moisture behind them. A thorough decon accounts for each mechanism.
Add wind load and UV exposure, and you get the “baked-on” problem. I’ve measured panel temperatures that exceed 140 degrees Fahrenheit after a few hours of driving in summer. If you spray an alkaline cleaner onto a hot panel or start scrubbing what looks like road film, you etch it in place. The trick is to cool, soften, then lift.
The driveway setup that makes decon safer
I prefer shade, a cool surface, and a light breeze. Two buckets with grit guards, a gentle pH-neutral shampoo for the contact wash, dedicated mitts for upper and lower panels, separate brushes for wheels, and a handful of premium microfiber drying towels are baseline. Keep a bug-releasing pre-soak, an enzyme-based cleaner, a tar remover, and an iron-reactive fallout gel within reach. For protection reapplication, have a silica spray sealant or ceramic detailer that plays well with whatever coating or wax you run.
On the machine side, a dual-action polisher with a small handful of foam pads can correct the micro-marring that sometimes appears after heavy decon. If the vehicle wears a ceramic coating, plan to use coating-safe chemicals and verify pH ranges. Too strong and you’ll shorten the coating’s life. Too weak and you’ll leave films that mute hydrophobics.
Hugo's Auto Detailing: what we adjust after long coastal routes
At Hugo's Auto Detailing, coastal road trips change our approach. Salt crystals sneak into door jambs, cowl vents, and the trailing edges of trim. We use a low-pressure, high-volume rinse first to flood seams, then an enzyme pre-soak to break down organics. On a wagon that returned from a week along the 101, we found the rear hatch channel caked with a white, crusty halo. A gentle citrus surfactant dissolved it without scrubbing. For coated vehicles, we balance dwell time and dilution to protect the ceramic layer while still stripping the salt film that kills the beading.
The warm rinse that matters
Hot panels turn cleansers into stains. I let panels cool to near ambient before touching chemicals. If that’s not possible in summer, a flowing rinse softens debris and brings temperatures down. Think of it as a reset. You’ll remove loose grit so your later steps don’t drag sand across paint.
Pre-soak for bugs, sap, and pollen
Enzyme or protein-targeting pre-washes make a big difference. Spray a bug remover onto front bumper, mirrors, windshield, and leading edges. Keep it off bare aluminum and unprotected metals. Let it dwell, then rinse thoroughly. For sap dots, especially after forest overnight parking, a mild tar-sap remover used panel by panel prevents smearing. Pollen often looks harmless, but when wet it can turn into gluey streaks. A foam pre-wash lifts it before you touch the surface.
The decontamination checklist
Use this sequence as a diagnostic workflow. If you find no tar, skip the tar remover. If the vehicle carries a fresh ceramic layer, soften your dilutions and shorten dwell times. The idea is to remove what exists, nothing more.
- Cool and rinse: Shade the car, rinse from top to bottom, flood seams, badges, and grille honeycombs to eject grit and salts. Chemical decon, organics first: Apply bug and protein pre-spray to the front third, sap remover for specks, let dwell, then rinse. Wheel and tire phase: Clean wheels, barrels, and calipers with iron-reactive gel if needed, then degrease tires for fresh dressing. Contact wash: Two-bucket method, upper panels first, lower panels last with a separate mitt. Rinse thoroughly. Decon for tar and iron: Spot-treat tar on rockers and rear, then apply iron remover to paint and glass. Rinse until runoff is clear.
Those five steps, in that order, prevent stacking chemical interactions. Organics go first because enzymes and bug dissolvers are designed for protein bonds. Tar removers next, because petroleum solvents can interfere with iron gels if applied later. Iron removers last, because they strip the final embedded ferrous particles and signal when you’re done by changing color.
Wheels are their own project
Road trips load wheels with baked brake dust and road oils. Clean them before the paint to avoid splatter. I start with a pH-balanced wheel cleaner and a dedicated barrel brush. If the wheels have a previous layer of protection, you’ll notice beading return quickly as the cleaner breaks film. For vehicles that saw heavy mountain descents, an iron-reactive gel earns its keep. It bleeds purple as it dissolves iron, and the color change lets you focus agitation where it’s still reacting.
Tires need a true degrease to strip old dressings that attract dirt. A stiff brush and an alkaline cleaner, worked until the foam runs white, gives you a clean slate for a water-based dressing that won’t sling. If you’re near salt or brine, don’t forget to rinse the wheel wells and the plastic liners. That’s where corrosion starts on fasteners and clips.
The contact wash that doesn’t mar
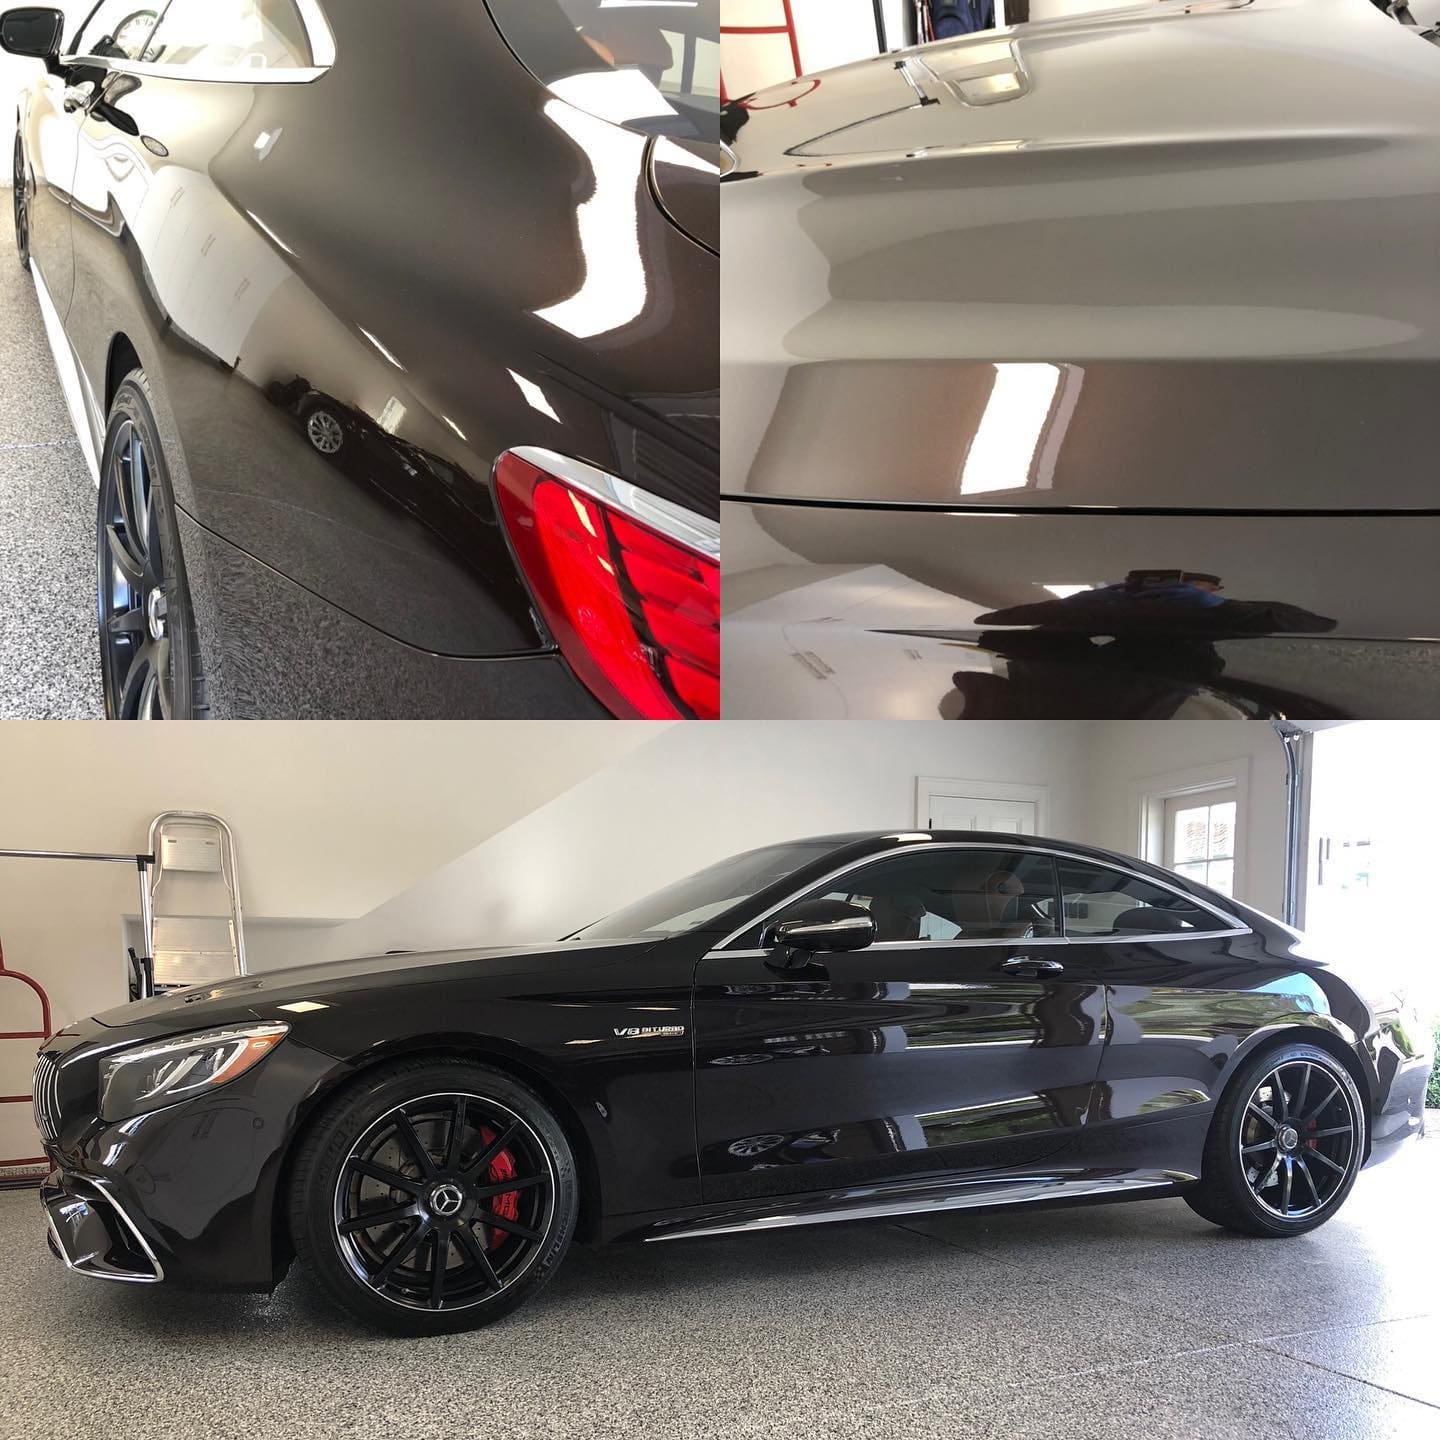
Even careful chemical decon doesn’t replace a contact wash. Foam is optional, but lubrication is not. I like a slick, pH-neutral shampoo with a plush mitt. Top to bottom, straight lines, light pressure. Rinse the mitt often. If the car carries a ceramic coating, a coating-safe shampoo helps, but the motion and cleanliness of the mitt matter more than the label on the bottle. The lower panels, rear bumper, and around the wheel arches deserve their own mitt, even if they look clean, because that’s where sand hides.
Dry with a blower if you have one to purge water from mirrors, trim, and badges. Then a soft towel for the remaining film. If you ran iron and tar chemicals, you may notice the towel gliding more freely than before. That lack of drag is your sign that embedded grit is gone.
Fallout removal: how to know when you’re done
Iron removers react visibly when they find ferrous particles. On white or silver paint, you’ll see a faint bleed pattern. On darker cars, look at the runoff. The first pass after a winter freeway run can look like diluted wine. After a thorough rinse, a second application should show far less color. When the reaction is minimal, you’re finished. Keep the gel off raw brakes, and never let it dry on glass or paint. If you smell a strong sulfur note, that’s normal for these products, but it should never linger once you rinse.
Tar shows as tiny black freckles along the lower body. A dedicated tar remover softens them so they wipe away without pressure. Work a small section, use a fresh microfiber, and rinse right after. Avoid broad sprays that run, since they can weaken old wax in unintended spots. If you have PPF, check the film manufacturer’s guidance. Most high-quality films tolerate gentle tar removers in short dwell times, but harsh solvents can cloud edges.
Glass deserves the same attention
Windshield glass accumulates wiper chatter marks and a buildup that looks like haze at night. After the main wash, treat the glass with an iron remover if you drove behind trains or through industrial corridors, then rinse heavily. If the glass still feels grabby under a towel, a fine-grade synthetic clay mitt with plenty of lubrication can help. Follow with an alcohol-based glass cleaner and replace the wiper blades if they stutter. A light sealant on the glass buys you clearer vision in heavy spray.
What ceramic coatings change, and what they don’t
Ceramic coatings resist contamination better than wax, but they don’t make you immune. They buy you time and reduce how deeply tar and bugs bond. On long trips, I see coated cars retain hydrophobics in the center of panels but lose them along the leading edges, rockers, and rear hatch. That’s normal. Use coating-safe versions of bug and iron chemistry, keep dwell times short, and restore slickness with a silica-rich topper after the rinse and dry.
We’ve had customers worry that iron removers will strip the coating. When used correctly, they won’t. The bigger risk is either letting chemicals dry or overusing aggressive solvents out of frustration. A second, lighter pass a week later is kinder to the coating than one heavy, marathon session. The film isn’t a force field. It’s a sacrificial layer that needs periodic, measured care.
Hugo's Auto Detailing on balancing decon and protection
In our shop at Hugo's Auto Detailing, we often see cars return from cross-state trips with coatings that still function but feel sluggish. A two-stage decon, spaced a week apart, often restores performance without reaching for polish. First visit, we focus on organics and iron. After the vehicle lives a week in local conditions, any residual tar halos become obvious and easy to spot-treat. Only when water behavior remains inconsistent do we consider machine polishing, and https://hugosdetails.com/marine-detailing/ even then we test a light polish on a small area before committing.
When a light polish is worth it
Heavy bug bombardment can etch. You’ll notice faint ghosting even after chemical decon. If the vehicle has no protection, or if the coating has aged beyond two years and feels dull, a one-step polish with a fine foam pad usually levels the etching without sacrificing clear coat depth. On coated cars, you may choose to live with the minimal ghosting rather than strip and recoat. The decision hinges on the owner’s tolerance for perfection versus the coating’s remaining life.
Clay: use it rarely and correctly
Traditional clay or synthetic clay tools can remove embedded contaminants quickly, but they can also induce micro-marring, especially on soft paints like some Japanese or European finishes. If you plan a polish anyway, clay is fine. If you want to preserve a coating without polishing, favor chemical decon and a gentle synthetic clay only when the paint still feels gritty after multiple rounds.
Interior fallout sneaks onto the exterior
It sounds counterintuitive, but interior detailing choices influence exterior cleanup. An over-sprayed interior dressing mist can drift onto glass and upper door sills, turning into a streaky film under sun. If you condition leather or dress plastics before washing the exterior, wipe the edges and seals after, then clean the glass again. It saves you from chasing hazy arcs that look like bad glass chemistry but are really interior residue.
Boat lessons that translate to cars
Marine detailing teaches patience with salt and minerals. Boats live in it. The same principles apply to cars that toured coastline. Flood-rinse first, use neutral soap, and chase seams with a soft brush so you don’t leave salt crystals in tight areas. If you manage a trailer after a launch, flush the winch, coupler, and running boards. For customers who cross from marina to highway, we apply a light boat ceramic coating to metal hardware and the trailer wheels. The coating makes rinse-down faster and keeps corrosion at bay. That thinking crosses over to SUVs with exposed roof rails and bike racks. A thin ceramic layer on those parts saves headaches later.
Regional differences: Carpinteria, Montecito, Goleta, Hope Ranch, Summerland
Local conditions change the checklist emphasis. Cars that base in Carpinteria or Summerland often see salty fog overnight, which leaves mineral rings around trim and glass if not rinsed weekly. Montecito and Hope Ranch routes have more tree cover and shade, so sap and pollen dominate. Goleta drivers tend to run freeway miles with construction zones, so tar and fine dust show up heavily along rockers and the rear fascia. A mobile Car detailing service that understands these microclimates will adjust the chemical order and dwell times. For example, if your commute includes the tunnel sections north of Santa Barbara, plan on an extra iron-remover pass on the hatch and rear bumper where eddies deposit dust.
Paint correction is not the default endpoint
Paint correction has its place, but it shouldn’t be a reflex after a road trip. If decon was thorough and the paint still looks flat, check lighting. Shop lights show what sunlight hides. If you find widespread wash marring from previous care, correction may be warranted. Otherwise, spend your effort on protection. A quality sealant or ceramic layer reduces the next round of bonded contamination. Correction removes clear coat. You only get so much to work with over the life of a car.
Short, targeted checklist for the next trip
A glovebox card helps. Keep it short and realistic. If the car is coated, note the products that play well with your protection. If it’s not coated, note that tar and iron steps will likely strip wax, so plan to reapply.
- Shade, cool rinse, flood seams and badges. Bug and protein pre-spray on front third, dwell briefly, rinse. Wheels and tires before paint, degrease tires until foam runs clear. Contact wash with two buckets, separate mitt for lower panels, rinse. Tar and iron remover as needed, gentle dwell, rinse thoroughly.
Those five remind you of order and priority without sending you to the store mid-wash. They also keep you from jumping straight to scrubbing, which is where most marring begins.
When boats share the driveway
If you tow or detail a boat at home, wash the boat first, then the tow vehicle. Marine salt spray rides the wind and will settle onto the car while you work. A Boat detailing service routine relies on constant rinsing and pH-neutral soaps for gelcoat and vinyl. That rhythm benefits cars too. Finish the boat, tidy your area, then reset buckets and towels for the car to avoid cross-contamination of marine and automotive chemicals. If you maintain a Boat ceramic coating on the vessel, you already know the discipline of using coating-safe shampoos. Carry that over to your coated car and you’ll extend the life of both protections.
Small edges that pay off
A few minor practices add up over a long trip. Remove bug guts promptly at gas stops with a damp microfiber and a travel-sized quick detailer, especially on clear bra. It keeps etching at bay. Rinse wheel wells with a coin-op hose if you ran dirt roads. Keep a soft brush in the trunk for door seals so grit doesn’t grind into them. Treat plastic trim with a UV protectant before the trip so bug cleaners don’t discolor unprotected plastics. And photograph the paint under fluorescent lights before you leave. When you return, compare. You’ll separate what the trip added from what was already there, which helps you decide whether you need a light polish or just a topper.
How Interior detailing intersects with exterior optics
Clean glass inside makes exterior rain repellents work better. An interior film scatters light and cancels the crisp water beading you get from good exterior prep. After a long trip where cabin air recirculated for hours, expect a film. Clean the inside glass last, with a dedicated towel that never sees dressings. If your windshield fogs more than usual afterward, you likely transferred interior product residue to the glass. A 1:1 isopropyl alcohol mix will reset it.
Hug the details in rugged areas
Plastic wheel arch trim, lower rocker guards, mudflaps, and the lip under the rear bumper collect the worst of the road. They also hide hardware that corrodes. After a trip, gently bend flexible plastics to release trapped grit and rinse again. Unbolt mudflaps yearly for a deep clean. If you live near the coast, consider a thin protective film or a ceramic-safe trim sealant on these parts. They hold up better against salt mist than dressings that just shine for a week.
When to call in pros, and what to ask
Not every driveway setup can manage a full decon, especially in drought restrictions or apartment parking. If you hand it to a professional, ask about their sequence rather than their products. Sequence reveals competence. A good Exterior detailing plan moves from least aggressive to most, and from top to bottom. If they offer Paint correction, ask how they measure paint thickness and what they do to protect edges and high spots. For coastal regulars, ask how they handle salt intrusion in seams. If you run both a truck and a center console boat, look for a team comfortable with Marine detailing so they grasp salt’s behavior and can advise on cross-maintenance at home.
Hugo's Auto Detailing: cases from Carpinteria to Hope Ranch
We’ve seen distinct patterns across the region at Hugo's Auto Detailing. In Carpinteria, cars that park outdoors near the beach collect a fine chalky film overnight. Two gentle rinses per week, even without soap, cut the need for heavy chemicals later. In Hope Ranch, magnolia and eucalyptus produce sap mist that dots hoods. We keep a mild sap remover in the kit and recommend a quarterly topper so sap lifts without rubbing. In Goleta, freeway tar is the villain. We switch to spot-only tar removal with short dwell times to protect adjacent plastics. Summerland’s narrow streets and leaf cover produce a constant dusting of organic debris that washes off easily if you don’t let it bake. Knowing these patterns lets us tailor the decon without overdoing it.
Protect what you just cleaned
Once the paint is clean and dry, seal the work. If you run a wax, lay it thin and even after tar and iron steps. If you’re on a ceramic system, match the topper to the base chemistry. A light silica spray, applied to a damp microfiber and wiped panel by panel, restores slickness and hydrophobics. Don’t chase perfection in a single session. A clean, protected car that sheds water and wipes down easily is what makes tomorrow’s bug splash a five-minute fix instead of a Saturday project.
A note on time and effort
A thorough decon after a week-long road trip takes time. Expect two to four hours for a careful driveway job, longer if you include wheels that received months of neglect. If you’re pressed, split it. Rinse and pre-soak one evening, wash and decon the next morning when panels are cool. Chemicals behave better in the morning, and you’ll avoid drying streaks on glass and trim. Good detailing is less about gadgets than about timing, touch, and restraint.
When boats and cars share coatings
Owners who keep a protected boat often ask if the same products work on cars. Some do, but automotive clear coat and gelcoat are different animals. Boat ceramic coating formulas are tuned to gelcoat’s porosity and UV load, and many of them are harder to level on automotive paint. The better approach is to keep dedicated products for each surface but align maintenance habits: rinse early, avoid sun-baked chemicals, and top up protection before seasonal changes.
The road-trip decon mindset
Think like a conservator, not a scrubber. Soften, lift, and flush. Use chemistry to do the heavy lifting and your hands to guide, not force. Diagnose what you see by location: bugs in the front third, tar and iron along the sides and rear, salts in seams, and pollen everywhere in spring. Adjust intensity based on the vehicle’s protection and the route you took. The next time you head out, your clean, protected finish will shed most of the mess, and your decon checklist will feel like routine maintenance rather than recovery work.
With that rhythm, even a long haul across multiple climates becomes easy to unwind. And whether you park under oaks in Montecito, run errands across Goleta, or spend weekends trailering along Summerland’s shoreline, the car will hold its gloss and the details will stay sharp. That’s the point of exterior decontamination after road trips: preserving the surface so the miles show up in stories, not in the paint.